Techniques: Provisional Crochet Cast-On
The Scalloped Lace Baby Cardigan starts with a provisional crochet cast-on. You cast on four stitches and work a number of garter ridges. Then you knit the four stitches, turn the work clockwise 90°, pick up one stitch in each garter “ditch,” and then turn the work again, unzip the provisional cast-on and knit the four “held” stitches. This gives you a seamless 4-stitch garter edging that goes up one side of the cardigan, around the back of the neck, and down the other side.
There are loads of ways to cast on that will give you live stitches going in two opposite directions. When I am going to be working the cast-on stitches right away (as you would in the toe of a sock or the bottom of a bag), I like Judy Becker’s Magic Cast-On (I like Jeny Staiman’s interpretation best), as it puts all the stitches on a needle or circular cable. But if I’m going to work in one direction for a while and then come back to other half of the stitches, I prefer to put the unused stitches on waste yarn using a provisional crochet cast-on.
A lot of knitting references will have you crochet a chain first, then pick up stitches in the chain. I find it far easier to cast the stitches directly onto my knitting needle. I’ve put together a simple tutorial to demonstrate this technique. I hope you find it helpful!
Materials:
- The yarn you plan to use for your project
- A knitting needle in the appropriate gauge for your yarn
- Some smooth cotton yarn for your provisional cast-on. The gauge of this yarn should be no larger than the yarn you plan to use for your project. (It can be smaller; I have a skein of a fingering-weight mercerized cotton yarn that I use for provisional cast-ons and for putting garments on waste yarn.)
- A crochet hook in a gauge close to that of your cotton yarn. (Gauge is not critical for the hook, but it should be large enough to hook the cotton yarn without splitting the plies.)
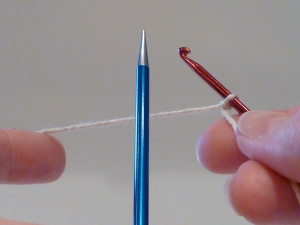
Step 1: Using your cotton yarn, form a slipknot and place it over your crochet hook.
Step 2: Hold your crochet hook in your right hand and your knitting needle in your left hand, with the working yarn held behind your knitting needle.
Step 3: Reach the crochet hook across the knitting needle and hook the working yarn.
Step 4: Pull the working yarn through the loop on the crochet hook. Tug the working yarn until the loop around the knitting needle is snug (the loop around the crochet hook should have enough slack to make it easy to pull the next loop through). You have now cast on one stitch.
Step 5: Move the working yarn behind the knitting needle. Hold the crochet hook in front of the knitting needle and reach across the needle to hook the working yarn again.
Step 6: Pull the working yarn through the loop on the crochet hook. Two stitches now cast on.
Step 7: Continue in this way until you have cast on as many stitches as you need. (Tip: cast on a few extra stitches. If you accidentally drop a loop while knitting the first row, you can simply skip that loop and move on to the next. Any extra provisionally cast-on stitches can simply be dropped at the end.)
Step 8: Once you are done casting on stitches, chain a few extra at the end by simply pulling the working yarn through the loop on the crochet hook without wrapping it around the knitting needle. Place a safety-pin or a locking stitch marker in the last loop. This will mark the end you will “unzip” from. You are done with the provisional cotton yarn at this point, so if you were working from a ball, you can cut the yarn, leaving a 6-inch tail or so to prevent your loop from unraveling by accident. (I keep several short lengths of cotton yarn in my knitting bag for this purpose or for putting stitches on waste yarn.)
Step 9: Hold the working yarn for your project behind your knitting needle with the crochet loops.
Step 10: Knit the first stitch as you would normally, then continue across the needle.
Step 11: When you have knit all the stitches that you need, you can slip the extra provisional loops from your needle. (They will not unravel and will form a simple crochet chain.)
Continue knitting normally. Your chained stitches will be held in place until you are ready to knit with them. When you need to free them, begin from the end with the stitch marker. Pull each loop out one at a time, placing each stitch on a free needle.
I hope you found this tutorial useful!
Posted on April 5, 2012, in knitting, techniques and tagged knitting, Provisional Crochet Cast On. Bookmark the permalink. 3 Comments.


Thank you so much for the fabulous photo-tute! I’ve used this cast-on for my toe-up socks and I just love it. It’s easy to do, easy to see and it’s so easy to retrieve the live stitches.
How do you work your toe? Do you cast on half the toe and then work a short-row toe? I like Judy’s Magic Cast-on, but I’m always playing with different increases. My new favorite heel uses German short rows, which seem to work better for me than wrap-and-turn short rows.
Great tutorial. I heave learnt so many new techniques just from your blog!