Blog Archives
Crafts of another variety
 A few years ago, I stumbled across a pretty green and red garnet necklace at a craft fair. I hadn’t seen green garnets before, and the whole combination just screamed my mother’s name at me. Her favorite color is green, and she wears a lot of shades of green, brown, rust, and brick reds, so the colors in the necklace would go with at least half of her wardrobe. I scooped it up and gave it to her for Mother’s Day. She loved it. She loved it so much, she asked if I could find out who made it and see if I could get earrings to match it.
Easier said than done. I did finally manage to track down the person who’d made the necklace, but she didn’t have any more green garnets. She had some other stones that were a similar color, but they were a different shape. I decided that I was going to have to hunt down some green garnets myself. I found some at a bead shop near my house. They were slightly smaller than the ones used in my mom’s necklace, but the color matched perfectly, and I was able to find some matching red garnet beads as well.
My mom didn’t like the clasp that had been used to secure the necklace, so I figured I could restring the necklace, replace the clasp, and while I was at it, I could substitute some of the new (slightly smaller) beads for two of the larger beads, which I could then combine with some of the new red and green garnet beads to make earrings. I had to purchase a string of each color of the garnets, so I had plenty of stones left over to make a matching double-stranded bracelet as well. So I finished the set up and gave it to my mom while she was visiting this past weekend. She was tickled.
 While she was here, we stopped into the local Michaels and found ourselves in the jewelry aisle. My mom picked up some pretty blue sodalite stones and commented that she just couldn’t find jewelry with blue stones that was set with gold. So in short order, we found some gold beads that would go with the sodalite, and before she left on Monday, I made her a bracelet and earring set. (I have a few sodalite stones left, so I am going to play around with a necklace, too. Shhhh!)
And as long as I had all my jewelry-making supplies out, I made a few more stitch markers. These were just simple silver jump rings with a seed bead glued over the seam of the jump ring, so there’s nothing to catch on your yarn. Nothing too fancy and quick and easy to make. They’ve already been put to use on the Scalloped Lace Baby Sweater!

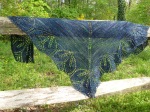
FO Friday: The Haruni Shawl

Pattern:
Haruni by Emily Ross
Yarn:
Sundara Sock Yarn in Lunar Landing (1 skein, 370 yards)
Needles:
Signature Needle Arts circular needle, US size 7 (4.5mm)
Susan Bates Crochet Hook, US size 9 (1.25mm) for beads
Boye Crochet Hook, US D (3.25mm) for fringe
Other Materials:
Miyuki Japanese Seed Beads (6/0 round) in Heavy Metals Mix, 2-20g tubes
Modifications:
Lots. I knit the body plain (similar to the body of the Ishbel shawl). I used my yarn scale and Excel to calculate how many petals I could get out of the single skein of yarn I had. I added extra clusters of petals at either end to maximize my yarn use. (And I ended up with only 3g of yarn when all was said and done). I added beads along the stem and the edges of each petal, using the crochet hook method.
The crochet bind-off was new to me. A little slow to execute, but again, well worth the effort. It might have looked a little bit better with a slightly smaller hook. I’m very glad I learned how to crochet before I tackled this!
Time to complete:
Less than a year. 🙂 I cast on for this in May of 2011, right after MDSW. I finished the plain portion in a week or so, and then it sat through the summer and into the winter, while I bought beads and figured out what size to make. The dark yarn and the beads made this project slow going.
The verdict:
Love, love, love it! This may be the most beautiful thing I’ve ever made.


Techniques: Beads and knitting
I still haven’t gotten good pictures of the finished Haruni Shawl, but in the meantime, let’s talk beads and knitting.
Haruni was my first shawl with beads. The original pattern didn’t call for beads, so I drew up my own version of the chart (which I had to do anyway because of my other modifications to the design) and marked where I wanted to place my beads. I knew there two basic ways (with loads of variations, of course) to place beads on your knitting: Stringing all the beads first, and placing the beads as you go.
The first method sounded like a lot of work, and (depending on how the pattern is designed) sometimes the beads can migrate to the back of the work, negating all that effort. It also causes extra wear-and-tear on the yarn, but since I was using a tightly-spun sock yarn, I wasn’t as worried about that aspect as I would have been if I’d been using a laceweight cashmere yarn.
The second approach, which is the one I opted for, was to place the beads as you go along. This can be done with a piece of orthodonic dental floss or with a tiny crochet hook. I tried both and found the crochet hook to be slightly easier to work. Plus, since I was using multi-colored beads, it gave me the flexibility of being able to select each bead individually so I could avoid placing two identical beads right next to each other. I also liked the fact that I could place a bead, then knit the stitch, so even if I dropped a stitch, I was less likely to lose the bead.
I took some photos and put together a small tutorial to show you how I did it. In the interest of thoroughness, I am using Sundara sock yarn, a US size 7 (4.5mm) Signature Needle Arts circular needle with stiletto tips, a US9 (1.25mm) Susan Bates crochet hook, and size 6/0 seed beads. (I strongly recommend using a very tapered needle for this method—the stilletto tips from SNA are perfect for this—so that you can replace the bead and knit it without distorting the surrounding stitches.)
- Scoop up a bead with the tip of the crochet hook. Turning the hook so that it faces up, insert the hook purlwise into the next loop on the left knitting needle and pull the loop off the needle.

- Using your finger, slide the bead down the hook and onto the loop of yarn, making sure that all strands of the yarn pass through the bead.

- Replace the loop onto the left needle, making sure that the stitch is oriented correctly. Keeping the stitch at the tip of the needle, use the tip of the right needle to knit the stitch. (If you try this with blunt-tipped needles or if you try to force the width of the entire needle, you’ll end up pulling yarn from the surrounding stitches and distorting your pattern.)

- Once you’ve knit the stitch and dropped it from your left needle, you can push the new stitch fully onto the right needle.

- Admire your knitting and your pretty beads!

- Resist the urge to place beads on all of your knitting projects. (I have found that husbands and boy children are somewhat less enamored of beads than I am…)


What projects have you knit with beads? What technique did you use? Any suggestions for me?
Indecision
I’m knitting on the Lanesplitter (it might be 60°F and drizzly on Sunday!) and on Haruni (it might be 75°F and sunny! And I’ll be inside, where I won’t need a scarf! But I want to wear one anyway!), which probably means I won’t be getting either one done in time.
I’ve still got 8 rows to go on Haruni, but I’m stopping to place a bead every 7 stitches or so, so it’s slooooooooow going (an hour for one RS row and one WS row, without distractions). (Did I mention that life is nothing but distractions right now? Really, the universe just looooooves to mess with my all-too-limited knitting time.) Plus, it’s dark yarn, with dark beads, so I can really only work on it during daylight hours, while sitting at my (white) kitchen counter.
I’ve also got 8 rows to go on the Lanesplitter. Those rows got a LOT faster (three knit rows, one purl row; zoom, zoom, zoom), but then I’ll need to graft the edges together, pick up stitches around the top for the waistband, knit said waistband, buy some elastic, and sew the waistband down. And it will still probably be too hot to wear in warm weather…

How could I resist such pretty colors?!
But in the meantime, I’ve got another knitting project in the germinating stage. I found out that my son’s teacher will be moving away at the end of the school year. She had a baby at the start of the school year, so I’m thinking that I should make a sweater for her daughter. Something cotton (they’re moving to Georgia) and with a bit of girly lace on the bottom. I have two pretty skeins of Ty-Dy Cotton that I picked up a while back that I’ve been wanting to use, and this seems like a good purpose to put it to. I did allow myself to poke around in my library of stitch dictionaries the other day, and I found a scalloped lace pattern that I think would work nicely with the self-striping nature of the yarn. But I’m not going to let myself swatch until these two projects are done, either before Sunday or after.
Really.
Sick and tired of being sick and tired

Lace looks like yarn vomit while it's still all mushed-up on the needles, doesn't it?
Sigh. I’m sick. Again. For variety, this time it’s a stomach bug instead of a head cold. I’m not any more thrilled about it.
I pulled out a long-languishing project from my WIP basket the other day, a beaded Haruni Shawlette. I am, of course, modifying the pattern all over the place (adding beads, using a plain Ishbel-esque body, and re-working the petals at the end to make the most of the limited yarn I have to work with, some yummy Sundara Sock Yarn in the limited-edition Lunar Landing colorway). But it’s gotten to the tricky bits near the end, and once again, I am just feeling too stupid to tackle them right now.
")
Look! Yarn vomit with beads!
I tried to take some pictures of the beads, but it’s pretty hard to get them to show up. And the colors look rather horrid, despite my best efforts to futz with my camera settings. Believe it or not, this is the same yarn you see in the blog header.
Fortunately, the Lanesplitter skirt is much simpler, so I am going to keep going with that for now. It looks pretty much the same as last time, so I didn’t try to photograph it again. And I’m still plugging away at the linen stitch scarf. The ball of yarn doesn’t seem to be getting any smaller. I think it’s taunting me!
Hopefully next time, I’ll have more progress to show.

