Blog Archives

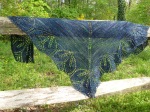
FO Friday: The Haruni Shawl

Pattern:
Haruni by Emily Ross
Yarn:
Sundara Sock Yarn in Lunar Landing (1 skein, 370 yards)
Needles:
Signature Needle Arts circular needle, US size 7 (4.5mm)
Susan Bates Crochet Hook, US size 9 (1.25mm) for beads
Boye Crochet Hook, US D (3.25mm) for fringe
Other Materials:
Miyuki Japanese Seed Beads (6/0 round) in Heavy Metals Mix, 2-20g tubes
Modifications:
Lots. I knit the body plain (similar to the body of the Ishbel shawl). I used my yarn scale and Excel to calculate how many petals I could get out of the single skein of yarn I had. I added extra clusters of petals at either end to maximize my yarn use. (And I ended up with only 3g of yarn when all was said and done). I added beads along the stem and the edges of each petal, using the crochet hook method.
The crochet bind-off was new to me. A little slow to execute, but again, well worth the effort. It might have looked a little bit better with a slightly smaller hook. I’m very glad I learned how to crochet before I tackled this!
Time to complete:
Less than a year. 🙂 I cast on for this in May of 2011, right after MDSW. I finished the plain portion in a week or so, and then it sat through the summer and into the winter, while I bought beads and figured out what size to make. The dark yarn and the beads made this project slow going.
The verdict:
Love, love, love it! This may be the most beautiful thing I’ve ever made.


Techniques: Beads and knitting
I still haven’t gotten good pictures of the finished Haruni Shawl, but in the meantime, let’s talk beads and knitting.
Haruni was my first shawl with beads. The original pattern didn’t call for beads, so I drew up my own version of the chart (which I had to do anyway because of my other modifications to the design) and marked where I wanted to place my beads. I knew there two basic ways (with loads of variations, of course) to place beads on your knitting: Stringing all the beads first, and placing the beads as you go.
The first method sounded like a lot of work, and (depending on how the pattern is designed) sometimes the beads can migrate to the back of the work, negating all that effort. It also causes extra wear-and-tear on the yarn, but since I was using a tightly-spun sock yarn, I wasn’t as worried about that aspect as I would have been if I’d been using a laceweight cashmere yarn.
The second approach, which is the one I opted for, was to place the beads as you go along. This can be done with a piece of orthodonic dental floss or with a tiny crochet hook. I tried both and found the crochet hook to be slightly easier to work. Plus, since I was using multi-colored beads, it gave me the flexibility of being able to select each bead individually so I could avoid placing two identical beads right next to each other. I also liked the fact that I could place a bead, then knit the stitch, so even if I dropped a stitch, I was less likely to lose the bead.
I took some photos and put together a small tutorial to show you how I did it. In the interest of thoroughness, I am using Sundara sock yarn, a US size 7 (4.5mm) Signature Needle Arts circular needle with stiletto tips, a US9 (1.25mm) Susan Bates crochet hook, and size 6/0 seed beads. (I strongly recommend using a very tapered needle for this method—the stilletto tips from SNA are perfect for this—so that you can replace the bead and knit it without distorting the surrounding stitches.)
- Scoop up a bead with the tip of the crochet hook. Turning the hook so that it faces up, insert the hook purlwise into the next loop on the left knitting needle and pull the loop off the needle.

- Using your finger, slide the bead down the hook and onto the loop of yarn, making sure that all strands of the yarn pass through the bead.

- Replace the loop onto the left needle, making sure that the stitch is oriented correctly. Keeping the stitch at the tip of the needle, use the tip of the right needle to knit the stitch. (If you try this with blunt-tipped needles or if you try to force the width of the entire needle, you’ll end up pulling yarn from the surrounding stitches and distorting your pattern.)

- Once you’ve knit the stitch and dropped it from your left needle, you can push the new stitch fully onto the right needle.

- Admire your knitting and your pretty beads!

- Resist the urge to place beads on all of your knitting projects. (I have found that husbands and boy children are somewhat less enamored of beads than I am…)


What projects have you knit with beads? What technique did you use? Any suggestions for me?
Crochet and Me
I never learned how to crochet, though not for lack of opportunity. My mom crochets beautifully. She made throw blankets, doilies, and beautiful crocheted coverlets for my bed and my brother’s bed. When I had my first child, she crocheted a beautiful blankie for us to cuddle under. She’s tried to teach me a couple of times, but I could never seem to get the hang of it.
Admittedly, most of the patterns I am drawn to are knitted, so this wasn’t really a huge problem. But every now and then, I’d see something– a blanket border or a jaunty flower– that was crocheted, and I’d think, I should learn how to do that. I even took a class at a local yarn shop, Cloverhill Yarn Shop, last fall. During the class, I got the hang of chaining, single crochet, and double crochet. Then I came home, put it down, and forgot about everything I’d learned. Sigh.

A tale of two washcloths...
So in the lull between Christmas and the start of the new year, I decided to make a couple of washcloths. Simple, square shapes that would still be useful, no matter how hideous they appeared. (Nothing like a positive attitude, right?!) I had some cotton/linen blend yarn laying around, so I picked up a hook and went to work.
The first one was just plain ugly. I did a few rows in SC, a few rows in HDC, and then used DC for most of the it. At the other end, I reversed the stitches. Although my rows were all the same width in the first and middle sections, they inexplicably narrowed through the last rounds of HDC and SC. I decided to call it a “design feature” (Trapezoidal washcloths! They’re the latest thing!), DC’d around the outside and called it a day.
For the second washcloth, I decided to make up a pattern. I started with a SC, then alternated DC2 and SC2 across, ending DC2, SC. On the next row, I reversed the pattern. I’m still working on this one, but it already looks a whole lot nicer than the first!
I’m not an expert at crochet now, by any means. But I can probably handle a granny square or a scalloped border, so I’m calling this one a win.
I should point out that my mom claims that she couldn’t learn how to knit, but she’s a crochet ace. She also paints and does beautiful needlepoint. I can’t draw a stick figure, and I am hopeless at needlepoint, but I love counted cross stitch. My mom hated counted cross stitch– too much counting, not enough artistic freedom. (My favorite “art pad” was a pad of graph paper. I suppose knitting charts were a natural progression?) So I guess it’s not a total surprise that my mom hated algebra, while I majored in mathematics in college. Me, left brain? Nahhhhhh. 🙂

